
If you’re looking to record professional quality vocals, one of the easiest ways to achieve this is by using a pop filter. But what is a pop filter?
A pop filter is a device that is placed between a vocalist and microphone to reduce the audio impact of plosives during a vocal recording. They are built using a mesh screen that disrupts and slows the air as it passes through.
If you’re wondering what a plosive is, what pop filters are made of, and whether you need one, I’ve covered all of that, and more, below.
What does a pop filter do?
A pop filter is a device made from mesh nylon or metal that’s placed between a vocalist and their microphone to limit the recording of “popping” noises made from plosives.
Plosives are the short bursts of air that come from pronouncing certain words, such as “t” in “top”. This air reaches the diaphragm of the microphone with a lot of energy which creates a low-end “pop” sound, also called a “plosive thump”.
When using a pop filter, the air is being passed through the mesh material before reaching the microphone. This means that the air from a plosive is being slowed down or redirected from the microphone, whilst allowing the overall sound through.
Using a pop filter creates a cleaner and more professional sounding recording that both sounds better and is easier to edit.
An additional benefit is that it keeps the microphone shielded from saliva that’s projected during vocal recordings. This saliva would otherwise reach the microphone, and can build up and damage the sensitive elements overtime.
Do you need a pop filter?
If you’re looking to get a professional sounding vocal recording, then using a pop filter is a must have for your studio.
It’s one of the easiest (and cheapest) ways that you can improve your audio recording quality, which will save you time when it comes to editing, mixing, and mastering.
As well as this, it can extend the life of your microphone by keeping saliva away from the sensitive mic parts, which will save you money in the long run.
That being said, you can achieve both of these benefits by recording “off-axis”. Recording off-axis means that you’re not projecting your voice directly into the microphone, but instead keeping it at an angle which reduces the impact of plosives on the microphone’s diaphragm.
This can, however, change the tone of the sound being recorded by affecting both high and low frequencies. For this reason, I’d recommend getting a pop filter to ensure you’re getting the best representation of your voice.
Different Types of Pop Filters
Pop filters are commonly made using either nylon, metal, or foam in the shape of a circle and are attached to a mic stand using a clamp.
Whilst they can come in different shapes, such as arches, this doesn’t impact the overall sound, whereas the materials that it’s made from does.
The different materials all have their pros and cons depending on what you’re looking for, and how much you want to spend.
Nylon Pop Filters
Nylon pop filters are the most commonly used type of pop filter for home recording, as they’re the cheapest to buy.
They’re designed with 2 pieces of meshed nylon screen attached to either side of a ring, with an air gap left in the middle. The first nylon mesh disrupts the plosive air coming towards it, and the air gap allows the air to disperse and pass through the remaining mesh and on to the microphone.
If the nylon material is too dense, however, it can interrupt the air too much and result in the loss of higher frequencies which can leave the recorded vocal performance sounding dull or flat.
This is more common in the cheaper, generic brands of pop filters that can be found online. For this reason, it’s important to consider the design of the nylon pop filter you are buying.
A final point on nylon pop filters is that they are harder to clean than their metal counterparts, due to the material and their design.
Metal Pop Filters
Metal pop filters are a more durable alternative to nylon pop filters, due to them being both more sturdy and easier to clean!
They are usually designed slightly differently to the nylon pop filters, as they tend to only use 1 screen instead of 2. This screen works by channeling the air towards the outer width of the microphone.
By doing this, it allows for more of the higher end frequencies to come through, as opposed to the nylon screen, which means that the vocal performance is closer to the original sound made.
This design can, however, introduce “whistling” for more powerful vocal performances though this can be overcome by increasing the distance between the performer and the pop filter.
There are metal pop filters that use the traditional double screen design, though these tend to be more expensive.
Foam Pop Filters
Foam is a lesser common material used for pop filters, but is very effective at removing pops and maintaining the original audio quality.
This is due to the cells in the foam disrupting the air whilst still allowing it through with a minimal impact on high end frequencies.
It’s important to understand the difference between a pop filter and a “windscreen” when discussing foam filters.
A windshield is a foam case that covers the entire microphone and is commonly used for situations where there will be excess wind, such as an outside TV reporter.
Whilst a windscreen will reduce pops, it will also have a larger impact on the high end frequencies as the material is thick.
A foam pop filter follows similar design to nylon and metal pop filters, with a single or double foam screen.
Whilst they are better for overall sound quality, foam pop filters are easier to damage than nylon or metal, which means that their performance can degrade overtime.
How much does a pop filter cost?
Pop filters are one of the most affordable pieces of studio equipment, and will cost between $30 and $75. More expensive filters are available, however, it’s debatable whether the more expensive filters justify the cost.
Likewise, whilst generic brand pop filters can be bought for as low as $10, it is generally better to pay a little more money for one from a known and established brand.
This is because cheaper products tend to be made using lower quality materials, which will impact the overall quality of your vocal recording. Most often, the material will be too thick which will result in a flat vocal recording.
Overall, the price-to-benefit ratio of a pop filter means that your studio should feature one. It’s a quick and easy way to start making your vocal recordings sound more professional.
Best pop filter for beginners
I recommend getting the SE Electronics Metal Pop Filter if you’re just getting started with pop filters.
You get all the benefits of a metal designed pop filter from a reputable brand, at a very budget friendly price.
The durable metal design means that it’ll be able to survive the daily wear-and-tear of studio use, and can be wiped down after use to keep it clean and sanitary.
If you’re not sure whether you want a metal or fabric pop filter, then the SE Electronics Dual Pop Shield Pro may be for you.
At a small additional cost, this pop filter comes with both a metal and fabric head that can be easily switched around.
This is great for beginners who want to try both, without breaking the bank.
Both of these will work great as pop filters for all microphones including the Blue Yeti, Shure SM7B, and SM78.
How to correctly set up a pop filter
To set up a standard pop-filter, simply follow these steps:
- Attach the pop filters clamp to a steady anchor point, most commonly a mic stand.
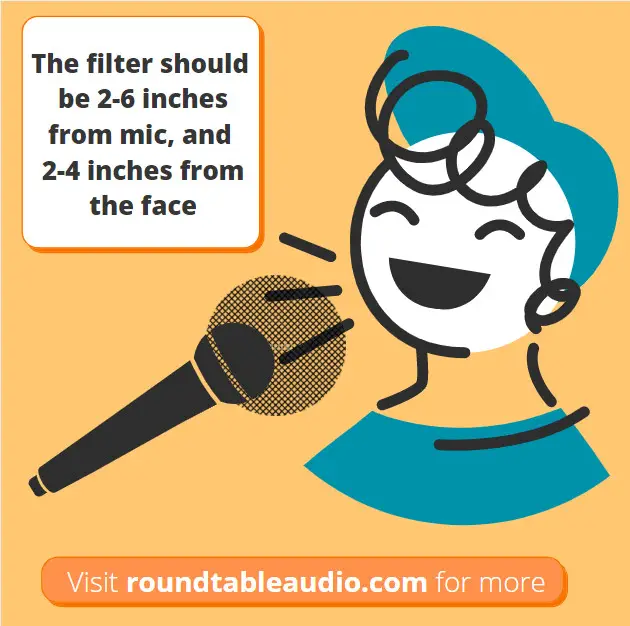
- Adjust the neck of the pop filter so that the head of the filter is between 2-6 inches away from the microphone.
- Position yourself so that your mouth is between 2-4 inches away from the pop filter

DIY Pop Filters
If you’re in need of a pop filter right now, and can’t wait to get one, then it is possible to make a DIY pop filter at home.
Essentially, you’re looking for anything that reduces the speed of air ahead of it reaching the microphone.
The most effective DIY pop filter is to stretch a pair of tights over an embroidery hoop, commonly used for cross stitching. This will create 2 mesh screens and a small air gap, much like the design of a nylon pop filter.
Another alternative is to hold a pencil in between the centre of your mouth and microphone. This will interrupt the high pressured air coming from the centre of your lips and divert it to either side of the pencil.
A mesh sieve can also be used as an improvised pop filter, as the meshed material will slow down and redirect the plosive air.
If all else fails, try placing a sock over your microphone. This will have a larger impact on your overall sound, and is less effective than the previous methods as the dense material of the sock will reduce the amount of high end frequencies recorded.
In addition, the lack of airspace between the sock and the microphone will reduce the amount of plosive reduction. I recommend trying this only if you’re out of other ideas!
Overall, while these methods may provide some useful benefits in a pinch, they shouldn’t be used as a full-time replacement for a pop filter.
Conclusion
That concludes everything you need to know about pop filters. I genuinely think that they’re one the quickest and cheapest ways to improve vocal recording, and should be a staple piece in any studio.
To summarise:
- Pop filters reduce the effect of plosive thumps by disrupting and/or diverting high energy air away from a microphones diaphragm
- They are made from either nylon, metal, or foam
- An improperly designed pop filter can impact the high end frequencies of your recording, leaving to a flat or muffled take
- A decent pop filter will cost between $30 and $75
- The pop filter should be between 2-6 inches from the microphone, and another 2-4 inches from your mouth
- You can make a DIY pop filter using household equipment, though these shouldn’t be used as permanent replacements for a pop filter
More Articles

What is a Guitar Nut?

Can You Reuse Guitar Strings (and Should You?)

Light vs Medium vs Heavy Guitar Strings Compared


14 Reasons Your Guitar Won’t Stay in Tune (With Fixes!)

Can You Put Electric Guitar Strings on an Acoustic? (My Experience)

How to Stretch Guitar Strings: Step-by-Step Guide


Conor is a music producer, multi-instrumentalist, and all-round enthusiast from the UK with over 15 years of experience. He’s the founder and sole-content creator for the roundtable audio blog and YouTube channel.