
It’s likely that you’ve seen the term “bus” when researching music production and have wondered what it means. It’s a term that confused me a lot early on, so I’ve put this guide together to help you!
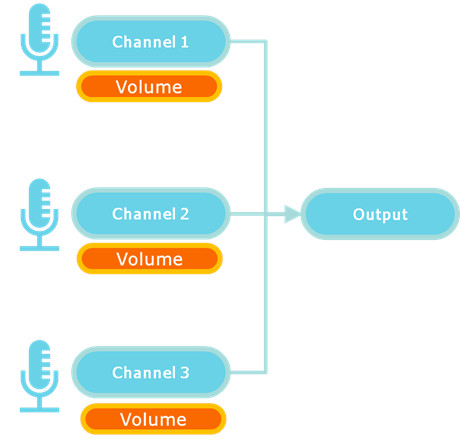
In music production, a bus is where a channels signal is routed to the input of another channel. A bus can route a channels signal, a copy of a signal, or a combination of multiple signals into 1 channel. Common uses for busses include submixes and parallel processing.
Busses can be a powerful tool to improve your music production when used correctly. They will save you a lot of time, processing power, and give you a lot of flexibility. Below, I’ve covered the definitions of common types of busses, how to use them, and some tips that will save you time in your workflow!
What is a bus in music production?
In music production, a bus routes a signal, or multiple signals, to a channel. Think of it like the bus we use for transport: people get on, get taken to a destination, and get off. This can be done for individual signals, copies of a signal, or grouping multiple signals together.
The 2 most common uses for busses are:
- Creating a Submix
- Parallel processing
I’ll cover the can purposes of both below!
Creating a Submix
A submix, also known as a mix bus or subgroup, is when multiple channels are routed into a single channel to create a group. This allows you to process multiple channels in a uniform way.
For example, imagine you’ve recorded 3 backing singers for a song, and each singer is recorded on their own channel. If you wanted to lower the volume of the backing singers, you would need to adjust each track individually.
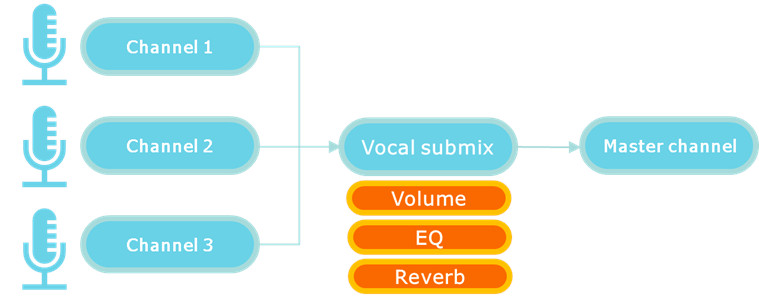
By creating a submix (routing the output of the 3 vocal channels into 1 channel) you can adjust the volume as a group.

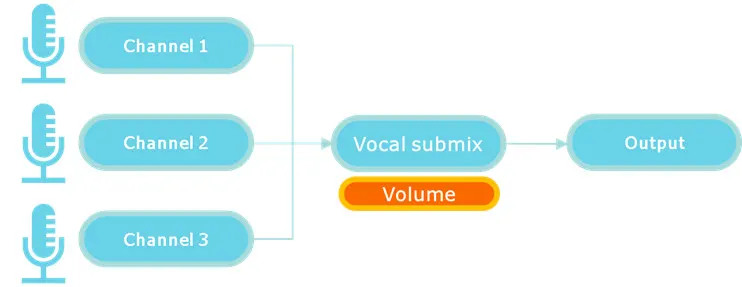
This is a great time saver. It also means that when you raise and lower the volume on the submix, it will change the volume proportionally. For example, if channel 1 is louder than channels 2 and 3, it will still be louder when adjusting the vocal submix volume.
Another great use for a submix is to apply effects (or “plugins”) to your group. By adding a plugin onto your submix, you can apply the effect to the whole group.
Again, this is a great time saver, and will also saving processing power.
For example, if you wanted to add EQ and Reverb onto each track, your computer needs to load each plugin 3 times. This will put more pressure on your processor.
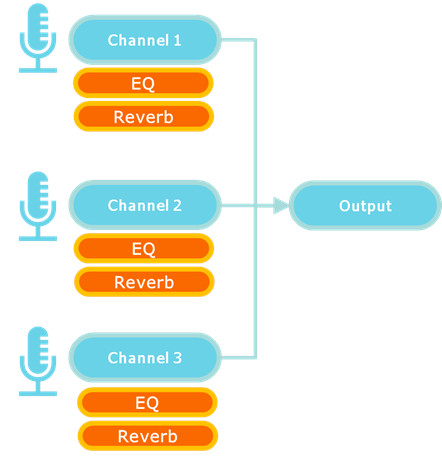
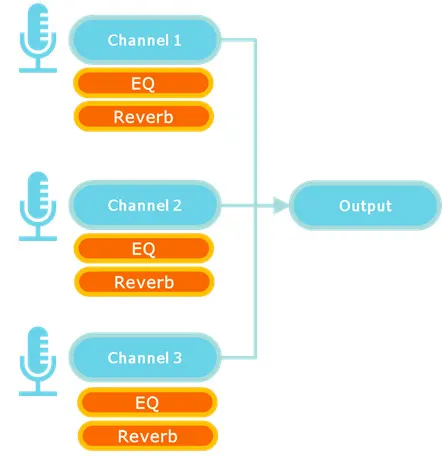
By having a submix channel, your computer only needs to load the plugins once, and it will apply the effects to the group.

Understanding submixes will help you get a better performance from your DAW and improve your music production quality.
Parallel Processing
Parallel processing is where copies of a channels signal are sent to another channel to be processed, usually by an effects plugin. The most common use for this is for when you want to use the same effect on multiple channels. It can also been called an aux send and return, or even just a send channel.
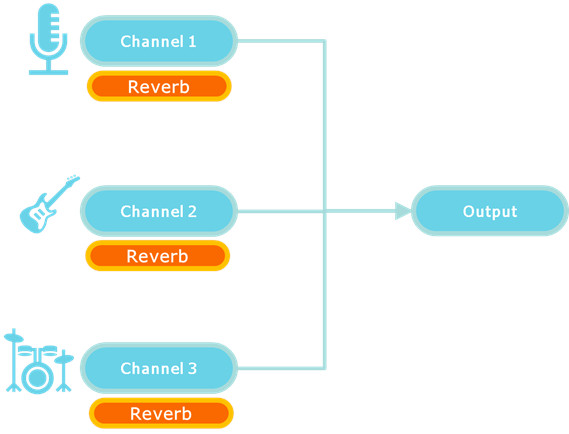
For example, if you wanted to add reverb to multiple instruments in a recording of a band, you could add plugins onto each channel, however, this will require a lot of processing power from your computer.

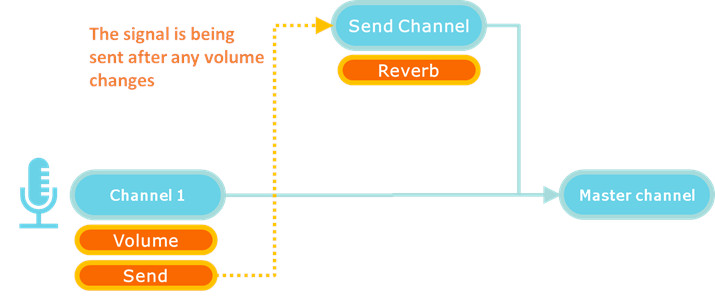
By setting up a dedicated reverb channel, you can add a send plugin on your instrument’s channels to different amount of each signal into the reverb effect. This sends a copy of the channels signal into the reverb effect, while the original signal is sent to the channels regular output. This means that you can keep the original sound, while blending in the effect.
Top tip: When you set up a plugin on a send channel, make sure it is set to “100% wet”. This means that it is only the sound of the effect on the channel, and none of the original signals sound. This will make it easier to control the overall loudness of your mix and blend the effect better.
When you’re adding a send plugin on your channel, you can add it pre- or post-fader.
Pre-fader
Adding your send insert pre-fader means that the send channel will receive a copy of the channels signal before any volume changes are made on the original channel. This means you can adjust the volume of the original channel, and it won’t affect the signal being sent to the send channel.

Pre-fader sends are usually best for this type of effects channel, as you can change the volume of the original channel without worrying whether it will upset how the effect sounds. It can also be used to create mixes for studio monitoring purposes, for example when redubbing instruments.
Post-fader
Adding your send insert post-fader means that the send channel will receive a copy of the channels signal after any adjustments are made to the volume.

Top tip: Create a template in your DAW with dedicated effects channels set up. This will save you a lot of time, as you won’t have to do it every time you start a new project.
Summary
As you can see, busses are an incredible tool for music production and will save you a lot of time and processing power. They can be used for creating submixes, parallel processing and monitoring. They can also be used for more advanced techniques such as New York Style Compression.
As ever, the best way to understand busses is to have a play in your DAW!
If you think I’ve missed something, or don’t quite understand, please get in touch using this form
Related Questions
What’s the difference between a bus and aux?
The difference between a bus and aux, is that a bus is the method for transporting a signal and an aux is the result. For example, creating a submix (as described earlier in the article) requires routing, or “bussing”, the different signals to a new channel. This new channel is an “auxiliary channel”, or aux channel.
What is a master bus?
The master bus, or master channel, is the channel that all channels output to in your DAW. The master channel consolidates all the signals into one channel, which is then output to a device, usually speakers.
What is a pre-master bus?
The pre-master bus is a channel that can be created to route all your other channels to. Some music producers and engineers use a pre-master bus to adjust audio before it is sent to the master bus. It has multiple applications, the most common use is for referencing the overall mix.


Conor is a music producer, multi-instrumentalist, and all-round enthusiast from the UK with over 15 years of experience. He’s the founder and sole-content creator for the roundtable audio blog and YouTube channel.