
If you make music on a computer or laptop (or are just about to!) then you’re going to need to use a MIDI keyboard. Fortunately, connecting a MIDI keyboard to a PC is a very straightforward process.
There are 4 different ways that you can connect your MIDI keyboard to your PC:
- USB cable
- MIDI to USB cable
- Via an audio interface
- Bluethooth
In this guide, I’ve written easy to follow, step-by-step instructions for all 4 methods. I’ve also shared extra tips throughout that I’ve learned during my years of working with MIDI keyboards.
Affiliate disclaimer: This page contains affiliate links for products that I’ve tried and tested. As an Amazon Associate I earn from qualifying purchases at no additional cost to you. Learn more here.
Identifying your options
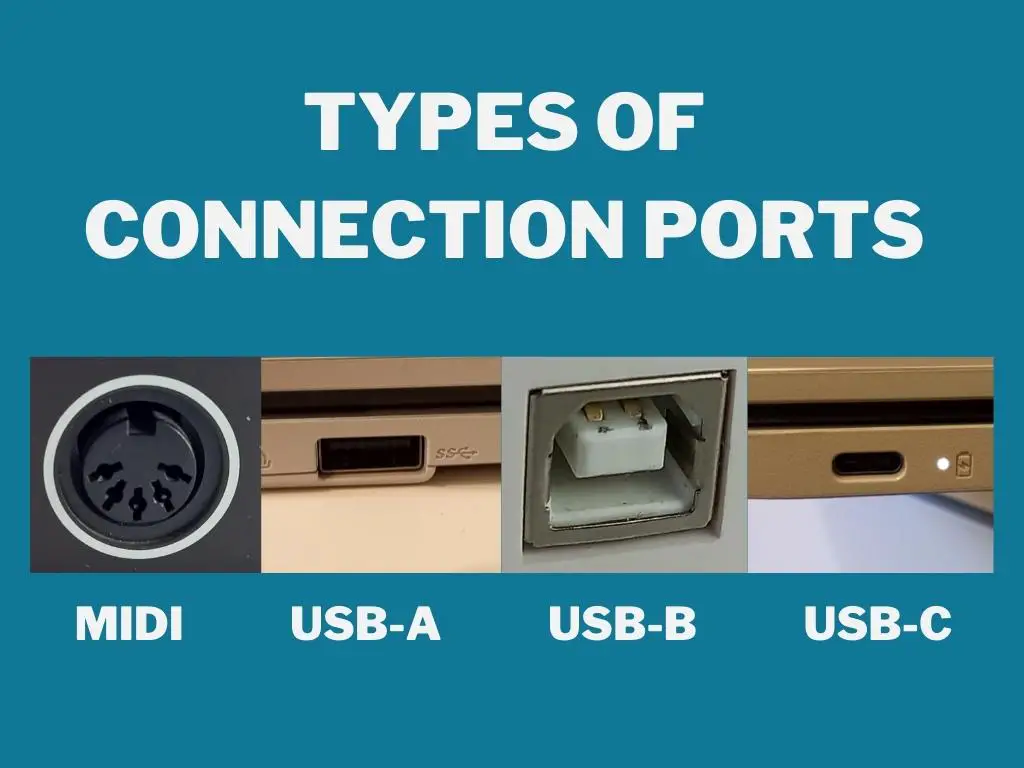
The types of ports on your MIDI keyboard will determine how you’ll be able to connect it with your PC. Check which ports your MIDI keyboard has, then click on the link to jump to that section.
- USB ports: If it has a USB port (A, B, or C) then it can be connected directly with a USB cable
- MIDI ports only: It can be connected with a MIDI to USB cable. Alternatively, you can connect it via an audio interface using a MIDI cable.
Some modern MIDI keyboards also have the ability to connect to your computer using Bluetooth.

How to connect a MIDI keyboard to a PC (via USB)
Connecting your MIDI keyboard to a PC with a USB cable is the easiest type of connection. You simply plug it in using a USB-A to USB-B cable, install some software, and away you go!
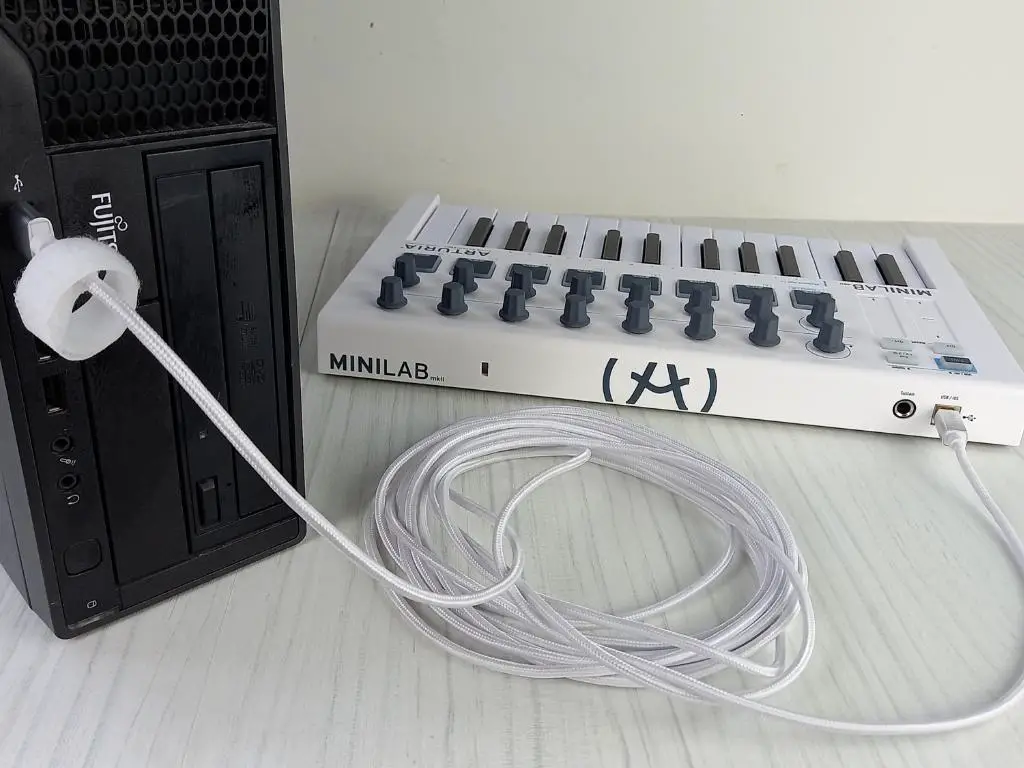
1) Connect the USB cable to your MIDI keyboard
Most modern MIDI keyboards come with a USB-B port. Plug the USB-B side of the cable into the keyboard.
2) Connect the USB cable to your PC
Next, plug the USB-A side of the cable into a USB port on your PC.
3) Power on your keyboard and PC
Most MIDI keyboards receive power from the USB connection. However, older models may need an external power source.
4) Set up the MIDI keyboard with your PC
Your MIDI keyboard should come with built in software called “drivers” that install automatically when plugged into the PC. These drivers help your PC and MIDI keyboard to talk, and understand, each other.
Some MIDI keyboards also come with additional software to help configure the MIDI keyboard further.
Make sure to follow any prompts (and the manufacturers instructions) to install the required drivers and software.
If you’re unsure, visit the manufacturer’s website.
5) Download and install the latest driver, firmware, and software updates
The drivers, firmware, and software that come with your MIDI keyboard might not be the most recent. The manufacturer may have released updated versions to address problems, or add new features.
Having the latest updates makes the connection between your MIDI keyboard and PC more stable, less likely to crash, and sometimes introduces new features and functionality.
Some MIDI keyboard come with a dedicated application for managing updates.
If your device doesn’t have an app, then I strongly recommend going directly to the manufacturers website to download any updates. Some third-party sites may have malicious software that can damage your computer.
6) Next steps
Your MIDI keyboard should now be set up and ready to make music.
If you’re not sure about what to do next, I recommend checking out my other article on how to use a MIDI keyboard. I’ve covered everything you need to know to start making sounds!
Top tip: I find that the cables that come supplied with MIDI keyboards are too short. If you’re setting up a small studio space, then I recommend replacing it with a cable that’s at least 6ft (2m). This will give you more room and flexibility around your studio, and makes it easier to hide the wire.
You can check out this cable on Amazon.
How to connect a MIDI keyboard to a PC (via MIDI to USB cable)
If you only have MIDI connections on your keyboard (which is more common in older devices) then you can still connect it to a PC, you’ll just need some different equipment.
If you just want a quick, cheap, and simple solution, then I recommend using a MIDI to USB converter. It lets you connect directly to your PC’s USB port. I’d recommend checking out this cable by Fore on Amazon.
1) Connect the “In” cable to the “MIDI Out” on your MIDI keyboard
It might seem confusing, but the cables are named to show you whether data is flowing “in” or “out” of the computer. So, you’ll need to connect the MIDI keyboards output to the “in” cable.
2) Connect the “Out” cable to the “MIDI In” on your MIDI keyboard
As above, the “out” cable carries computer’s output. So, you can connect this to your MIDI keyboards input to control your MIDI device from your computer.
If you’re just looking to use your keyboard to control your PC, you can skip this step.
3) Connect the USB cable to your PC
Connect the final cable to your computer’s USB port. Your computer will now be able to send and receive data from your keyboard from this one USB port.
4) Power on your PC and MIDI keyboard
Unlike the previously listed USB connection, a MIDI to USB cable won’t power your MIDI keyboard. So, make sure that it’s powered up, as well as your PC.
The MIDI to USB cable itself is powered by the PC, so it won’t need an external power source.
5) Set up the USB to MIDI cable with your PC
The MIDI to USB cable should come with drivers that will begin installing once the cable is connected to your PC. These drivers tell your PC what the cable is, and helps them work together.
6) Download and install the latest drivers
I recommend visiting the manufacturers website to make sure that you have the latest version of the drivers installed. Remember: the drivers that come with the device may be out of date!
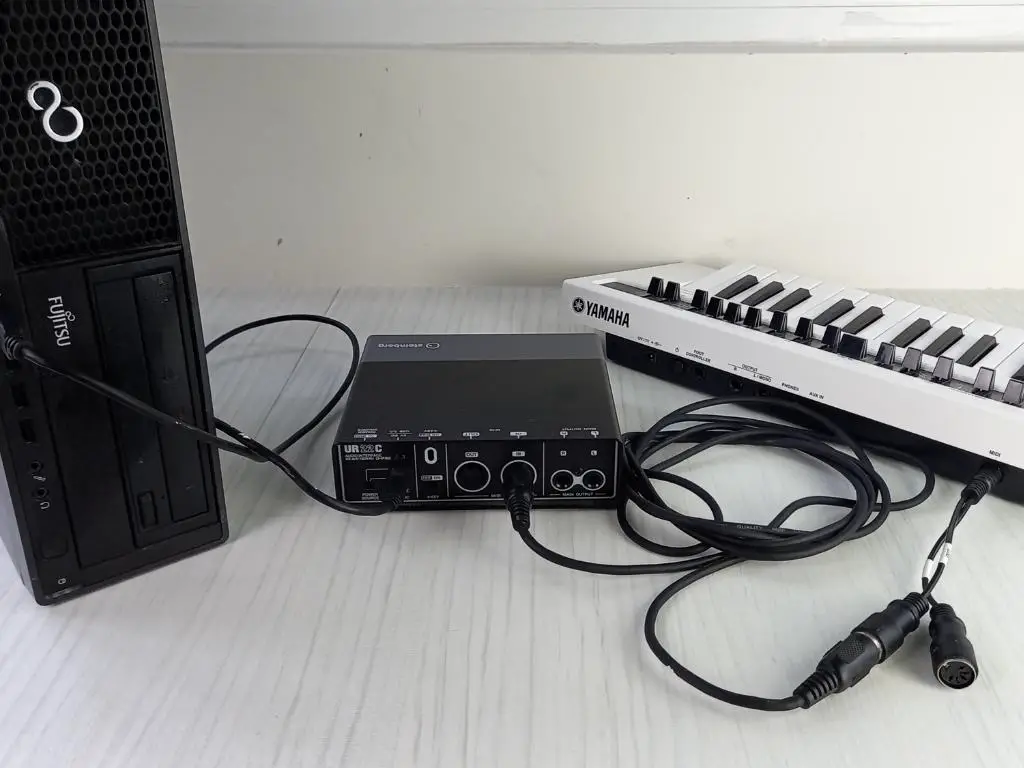
How to connect a MIDI keyboard to a PC (via audio an interface)
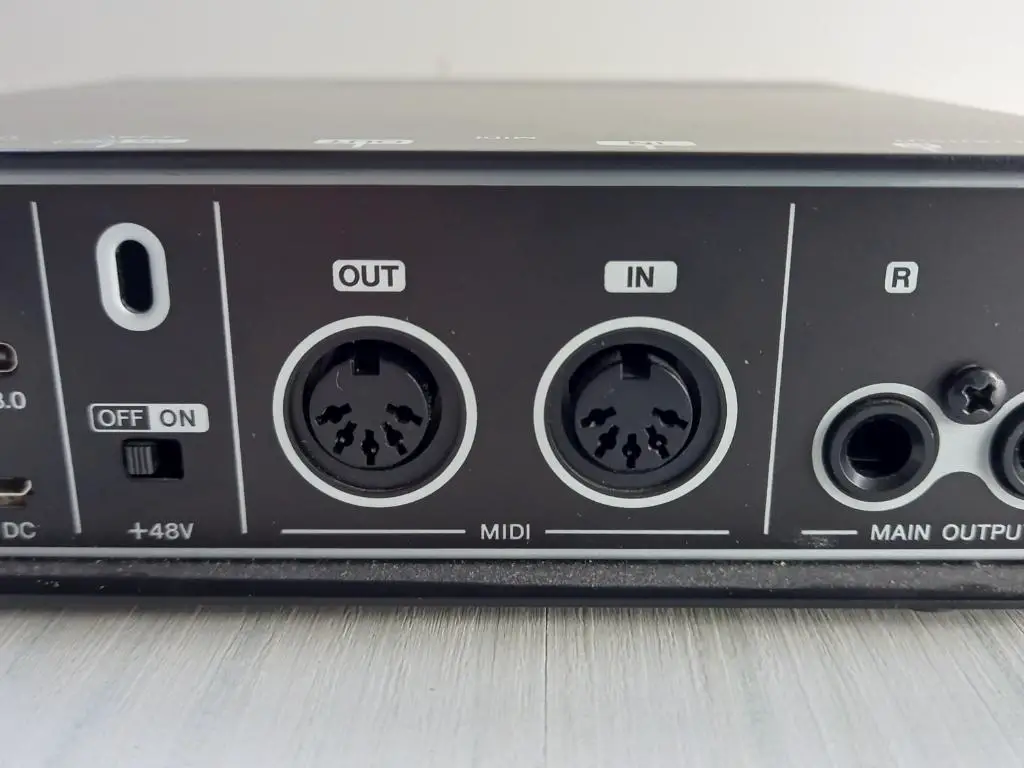
Another way to connect a PC to a MIDI keyboard that only has MIDI connections is by using an audio interface that has MIDI in/out ports.
These audio interfaces are more expensive than MIDI to USB cables, but they have more functionality. They have additional connections that can record instruments like vocals, guitars, and synthesizers. But, not all audio interfaces have MIDI connections.
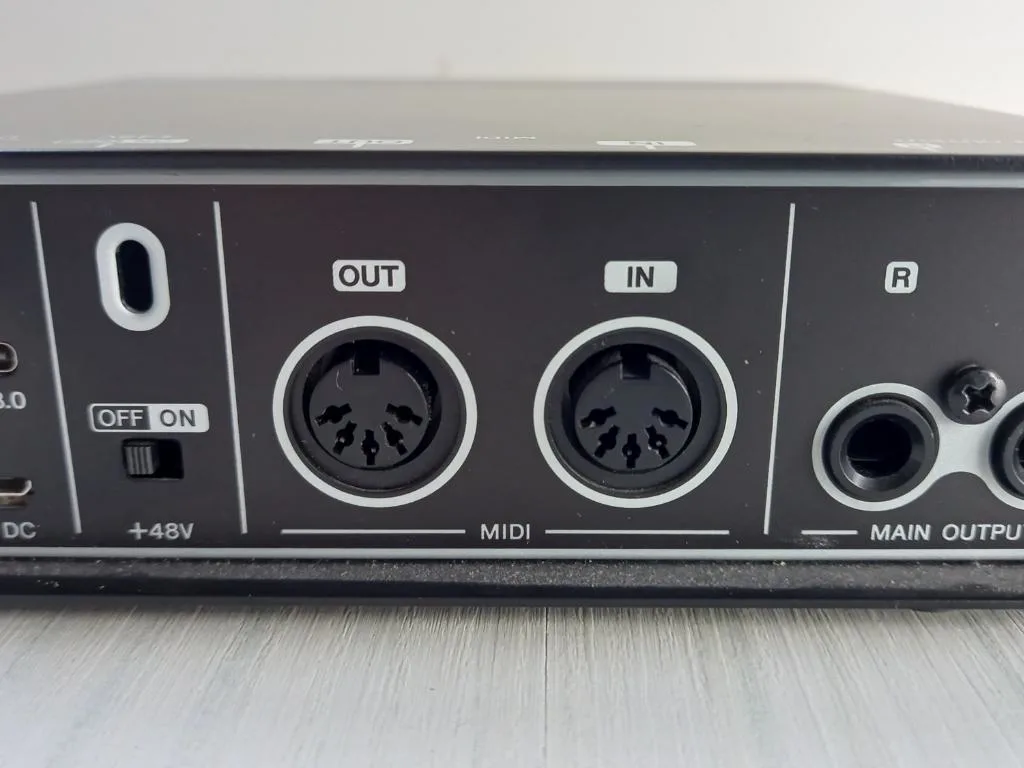
For this reason, I use the Steinberg UR22C, as it’s one of the best quality audio interfaces under $200 that has MIDI in/out ports. You can check it out here on Amazon.
You’ll also need a MIDI cable to connect your MIDI keyboard to the audio interface (two cables if you want to connect both in and out). Luckily, these cables are quite cheap. You can pick one up here from Amazon.
1) Connect the MIDI cable to “MIDI Out” on your MIDI keyboard
To send data from your keyboard to your audio interface (and onwards to your PC), connect the MIDI cable to the “MIDI Out” port.
2) Connect the MIDI cable to “MIDI In” on your audio interface
Next, connect the other end of the MIDI cable to your audio interface’s “MIDI In” port. Now, it’ll be able to receive information from your MIDI keyboard.
3) Connect your audio interface to your PC
Your audio interface should come with a USB cable to connect it to your PC. If your audio interface didn’t come with a cable (e.g. if you bought it second hand), then pick up a USB cable. Most audio interfaces will use a USB-A to USB-A connection.
4) Power up your MIDI keyboard, audio interface, and PC
Modern audio interfaces are powered directly from the USB connection with the PC. However, some may need an external power supply. If you’re not sure, check the manufacturer’s website.
Your MIDI keyboard won’t receive any power from the MIDI cable, so it’ll need an external power source.
5) Set up the audio interface with your PC
Like any device, your audio interface should come with drivers that tell your PC what the audio interface is, and how to talk to it.
Some audio interfaces may also come with additional software to help with further configuration.
Follow the instructions on the installation wizard, and any manufacturer’s instructions supplied with the audio interface.
6) Download an install the latest drivers, firmware, and software
It’s possible that the drivers, firmware, and software on your audio interface is out of date. Visit the manufacturers website and download the latest versions. This will make the connection between your audio interface and PC more stable and reliable.
How to connect a MIDI keyboard to a PC (via Bluetooth)
Connecting a MIDI to a PC via Bluetooth allows for a wireless connection with your PC. This is great for both portability and keeping your studio clean and tidy.
It also means that you can connect your MIDI keyboard with other devices like phones or tablets.
1) Enable Bluetooth on your MIDI keyboard
The first thing you’ll need to do is enable Bluetooth on your MIDI keyboard. This varies from device to device, so check the instructions that came with your MIDI keyboard, or visit the manufacturer’s website.
If your MIDI keyboard doesn’t have built-in Bluetooth, you can buy a special MIDI Bluetooth adaptor. This adaptor connects to the MIDI in/out ports and then sends the information to a connected Bluetooth device.
These adaptors can be quite pricey, so I recommend doing your research before buying one. You can check them out here on Amazon and read the reviews to find which one is right for you.
2) Enable Bluetooth on your PC
Next, go to your computers “settings” or “preferences” and enable Bluetooth.
If your PC doesn’t have Bluetooth, you can buy a USB Bluetooth dongle that will give it Bluetooth functionality. They’re very small and affordable. I use this one from TP-Link, you can check it out here on Amazon.
3) Pair the devices together
Use your PC’s Bluetooth pairing function to discover your MIDI keyboard and connect them.
If your MIDI keyboard doesn’t connect, try connecting it via USB first. It may be that you need to install the drivers before using Bluetooth for some MIDI keyboards.
4) Set up the MIDI keyboard with your PC
Your MIDI keyboard may install some drivers once it has paired with your PC. Follow the on-screen prompts to finish setting up your device.
5) Install the latest drivers, firmware, and software
Finally, I recommend visiting the manufacturers website to download the latest drivers, firmware, and software for all the devices you’re using (i.e. the MIDI keyboard and any Bluetooth adaptors).
This will ensure that your devices are working in their optimal condition. For Bluetooth, it’s especially important as the latest drivers may patch any known security problems!
Conclusion
There’s a lot of different ways to connect your MIDI keyboard to a PC, you just have to find the one that’s right for you.
Remember, always check to make sure that you’ve got the latest updates for any drivers, firmware, and software that you’re using. It’ll make the connection between your MIDI keyboard and PC much more secure, reliable, and safer.
Finally, if you’re looking for what to do next, I’ve written a full guide on how to use a MIDI keyboard that you can find here.


Conor is a music producer, multi-instrumentalist, and all-round enthusiast from the UK with over 15 years of experience. He’s the founder and sole-content creator for the roundtable audio blog and YouTube channel.