Ableton Live is the most popular DAW for music producers and can be used to great effect with additional VST plugins.
It can be tricky to load plugins into Ableton Live, so I created this guide to show you how to install, add, and open VST and VST3 plugins on Windows.
To add plugins to Ableton Live on Windows:
- Download the plugin as 64-bit
- Run the plugin installer
- Save the plugin in the folder where your 64-bit plugins are stored
- Open “Preferences” in Ableton Live (Options > Preferences)
- Select “Plug-Ins” from the left menu
- Toggle “Use VST2/VST3 Plug-In Custom Folder” to “On”
- Select “Browse” next to “VST2/VST3 Custom Plug-In Folder”
- Select the folder where your 64-bit plugins are stored
- Open the Browser in Ableton Live (View > Show Browser)
- Select “Plug-Ins” in the Browser
- Drag the desired plugin onto your channel
- Select your channel and open “Detail view” (View > Show/Hide Detail View)
- Click the “spanner” icon on your plugin to open it
If you follow these steps correctly, you’ll now have your VST and VST3 plugins added to your channel in Ableton Live. I’ve included pictures under each step below to help you navigate the system better.
Don’t worry if these steps don’t’ work for you! It’s likely to be for a couple of simple reasons that I’ve covered in my troubleshooting guide at the end.

How to add plugins to Ableton Live on Windows
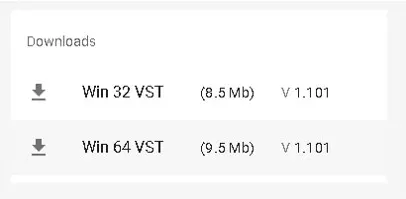
1. Download the plugin as 64-bit
This is a very important first step and is usually the reason for plugins not showing up or working! Ableton Live is a 64-bit programme and only supports 64-bit plugins. If you download a copy of your plugin as a 32-bit, it will not work!
Newer plugins will usually offer both 32-bit and 64-bit versions, but older plugins may only be available as 32-bit. If you can only find a 32-bit version of your desired plugin, I recommend finding a new plugin.
While you could use a bridging programme such as jBridge to allow you to use 32-bit plugins in a 64-bit programme, this can lead to stability issues later. Also, as this is 3rd party software, it may not be supported or compatible forever.
For these reasons, you’re best getting a stable, developer supported, 64-bit version of a plugin.
2. Run the plugin installer
Once you’ve downloaded the plugin installer, go to your downloads folder which is found at: C:\Users\yourname\Downloads
Open the plugin, and it will begin the installation process by opening the installation wizard.
Top tip: If you’re having trouble installing your plugin, it may come with a “README.TXT” document with instructions. If not, check out the developer’s website for additional support!

3. Save the plugin in the folder where your 64-bit plugins are stored
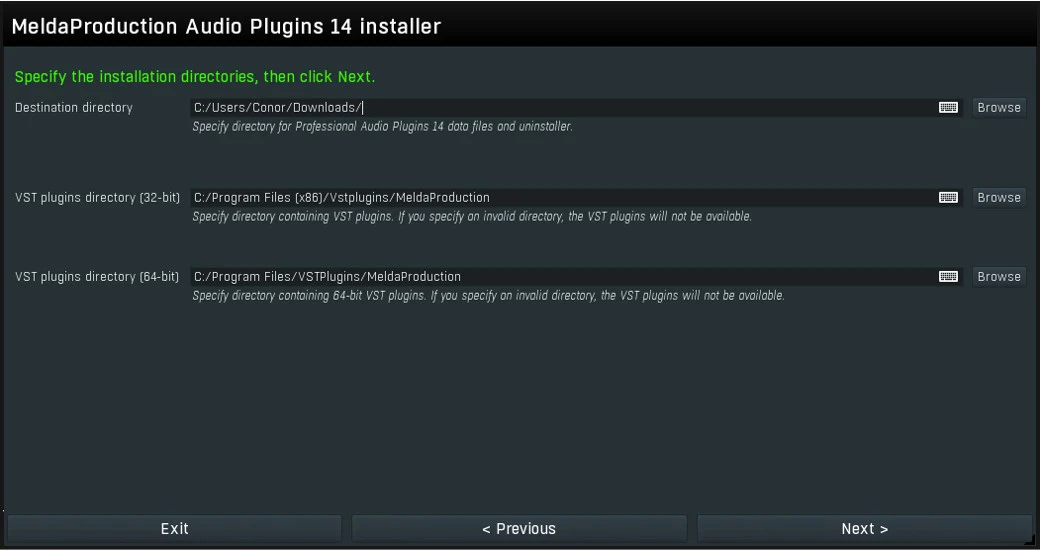
When prompted by the installation wizard, choose a folder to save your new VST to.
There’s a few different places you might want to save your VST plugins. Ableton recommend these folders:
- 64-bit VST2 plug-ins: C:\Program Files\VSTPlugins
- 64-bit VST3 plug-ins: C:\Program Files\Common Files\VST3
- 32-bit plug-ins: C:\Program Files (x86)\VSTPlugins
Ultimately, it’s up to you where to save your VST plugins to, just make sure that you’re saving the same types to the same place.
That means that all your VST2 plugins are saved together, all your VST3 plugins are saved together, and any 32-bit plugins are saved together. So, you should have 3 folders overall.
I use the file paths listed above to save my VST plugins to!
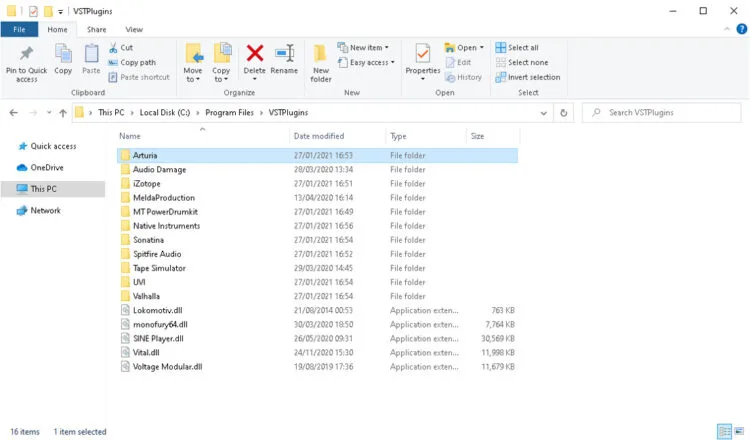
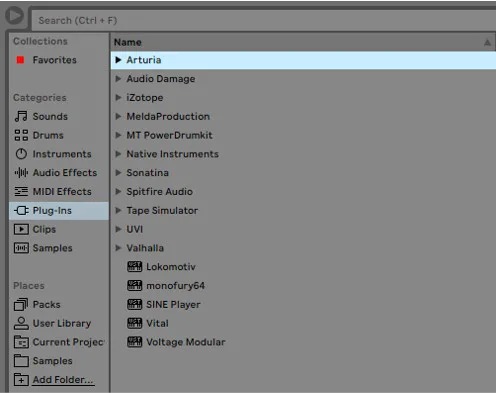
Top tip: Create sub-folders in your main VST folders to group plugins by company names or plugin types! This is achieved by creating a new folder in the VST folder and dragging the .dll plugin file into this folder. I do this to make it easier to find plugins in Ableton, as shown in the 2 pictures below!
4. Open “Preferences” in Ableton Live (Options > Preferences)
With Ableton Live open, open the “preferences “window by selecting “Options” from the menu bar, then select “preferences”. Alternatively, you can use the shortcut “Ctrl+,”.
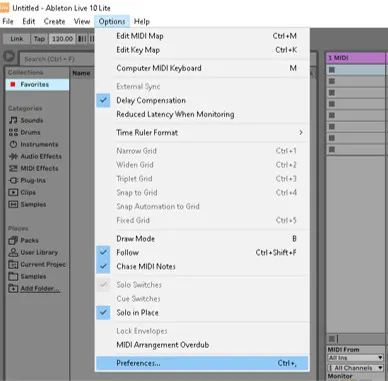
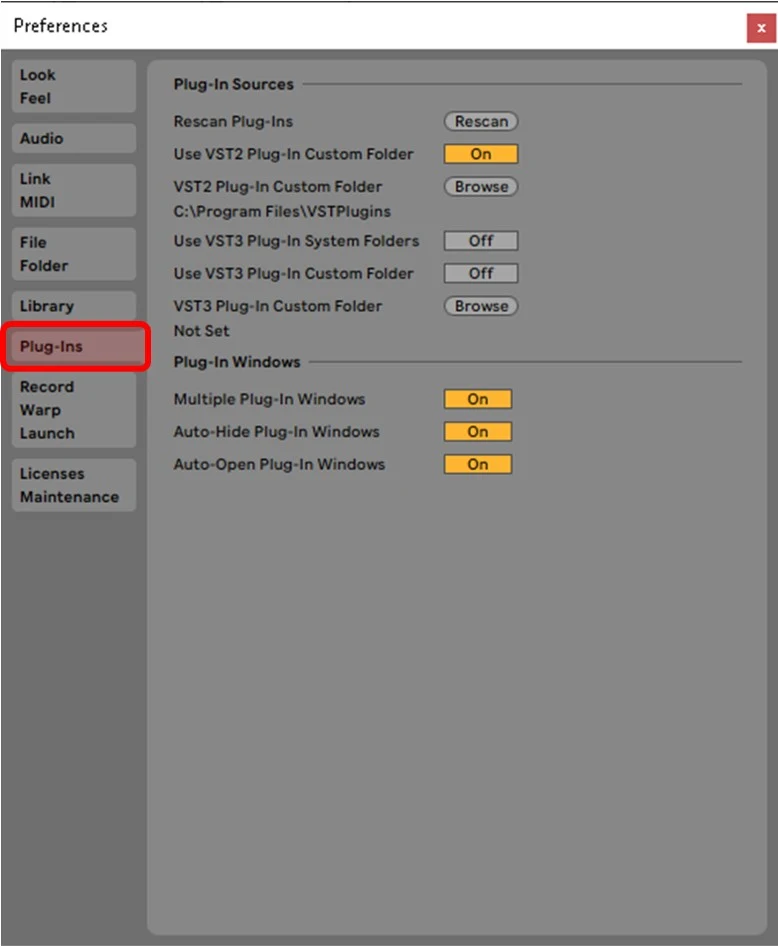
5. Select “Plug-Ins” from the left menu
Select the “Plug-Ins” option on the left menu in the “preferences” window to open up the plugins menu. I’ve highlighted this section in red on the below image.
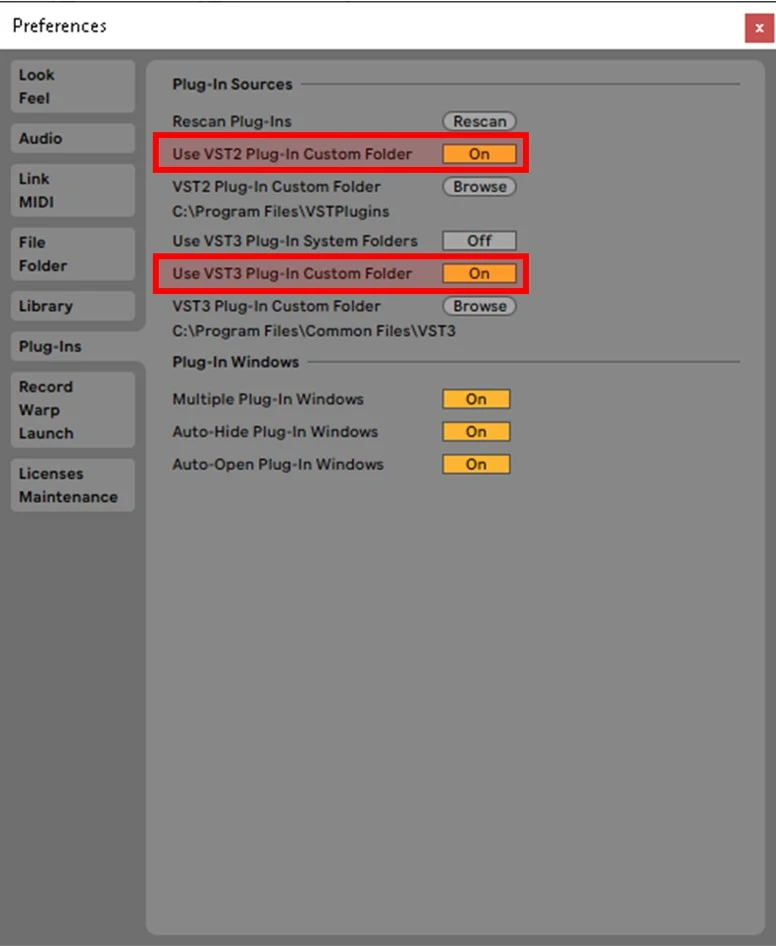
6. Toggle “Use VST2/VST3 Plug-In Custom Folder” to “On”
Make sure that the option “use VST2/VST3 Plug-In Custom Folder” is set to “On”. It will turn orange when it’s on.
I’ve highlighted both these sections in red below!
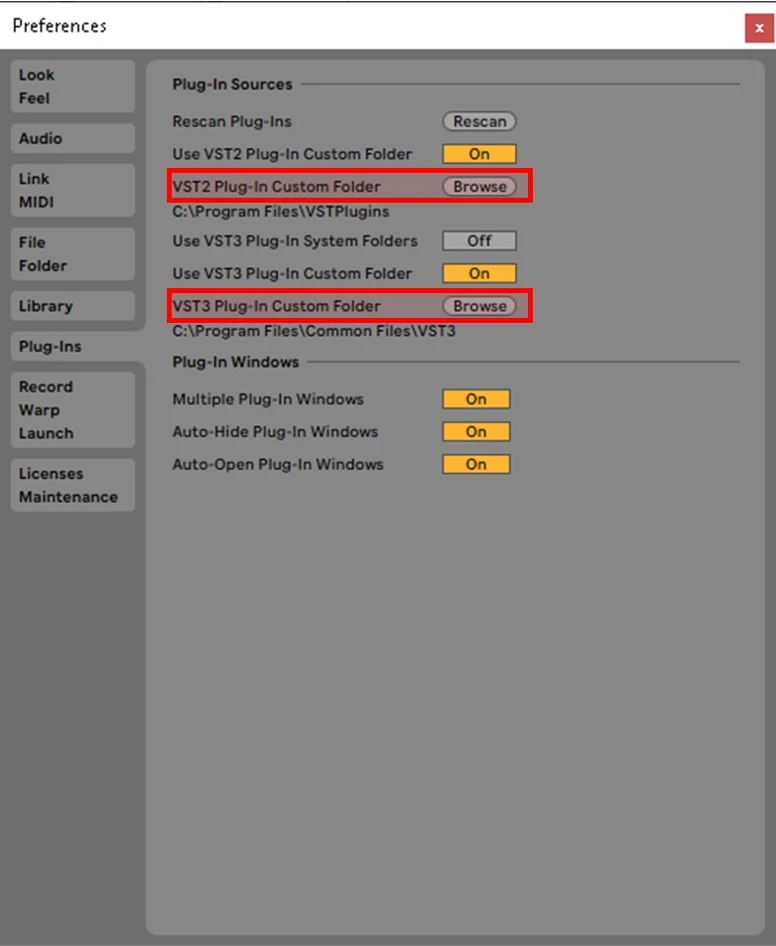
7. Select “Browse” next to “VST2/VST3 Custom Plug-In Folder”
Turning the options to “on” should automatically open up the window to select the folder where your VST’s are stored. If it doesn’t, selecting “Browse” will open up the windows file explorer . I’ve highlighted these in red below.
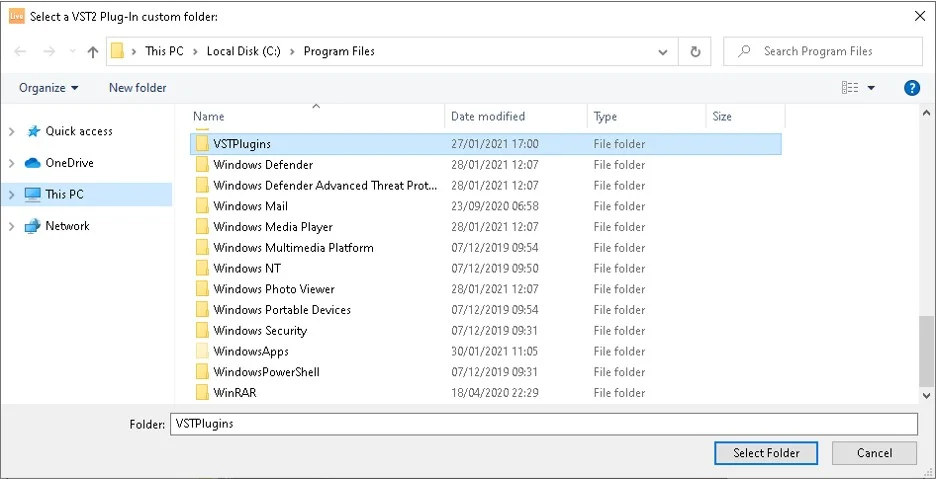
8. Select the folder where your 64-Bit plugins are stored
Now it’s time to tell Ableton Live where your plugins!
Select the folder where you saved your plugin in step 3. For my VST2 plugins, this would be C:\Program Files\VSTPlugins (as shown in the image below!).
For my VST3 plugins, it’s C:\Program Files\Common Files\VST3
Note: 32-bit VST files are saved in C:\Program Files (x86)\VSTPlugins, but again, these aren’t added into Ableton Live.
9. Open the Browser in Ableton Live (View > Show Browser)
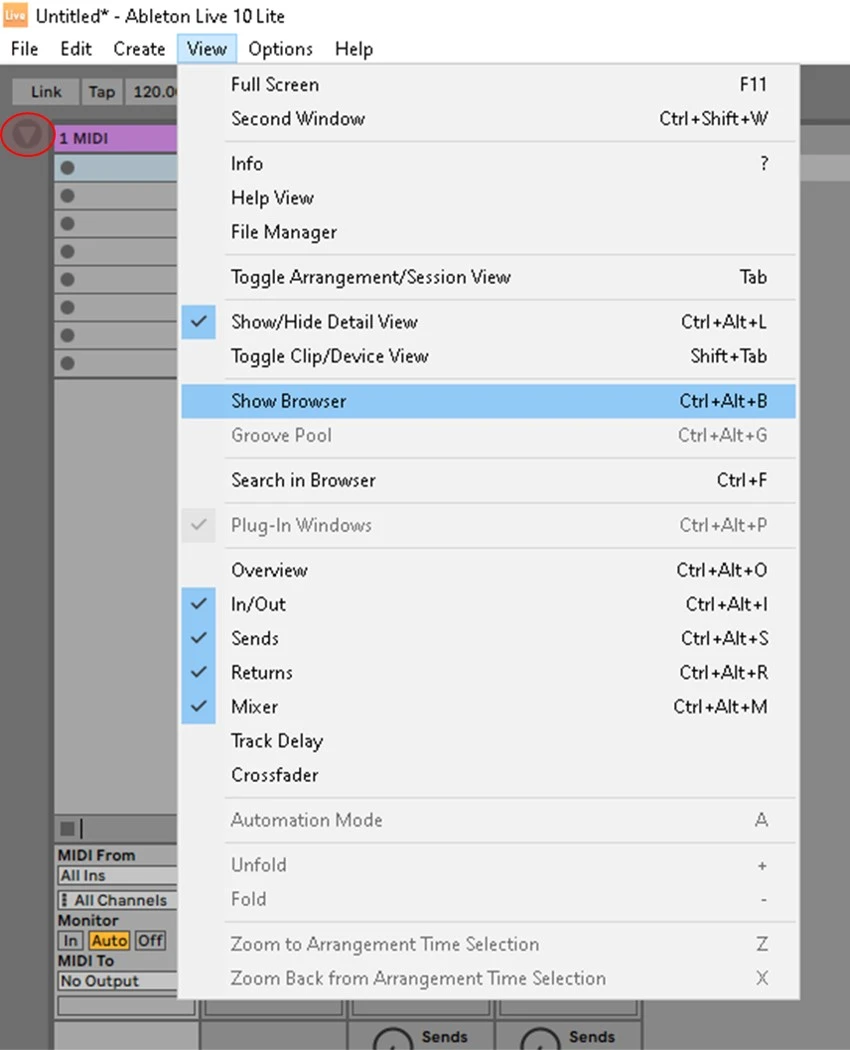
Open the browser in by clicking on “view” in the menu bar and then “show Browser”. You can also use the shortcut “Ctrl+Alt+B”, or by clicking on the small arrow towards the top left of the DAW (I’ve circled this in red on the below image).
10. Select “Plug-Ins” in the Browser
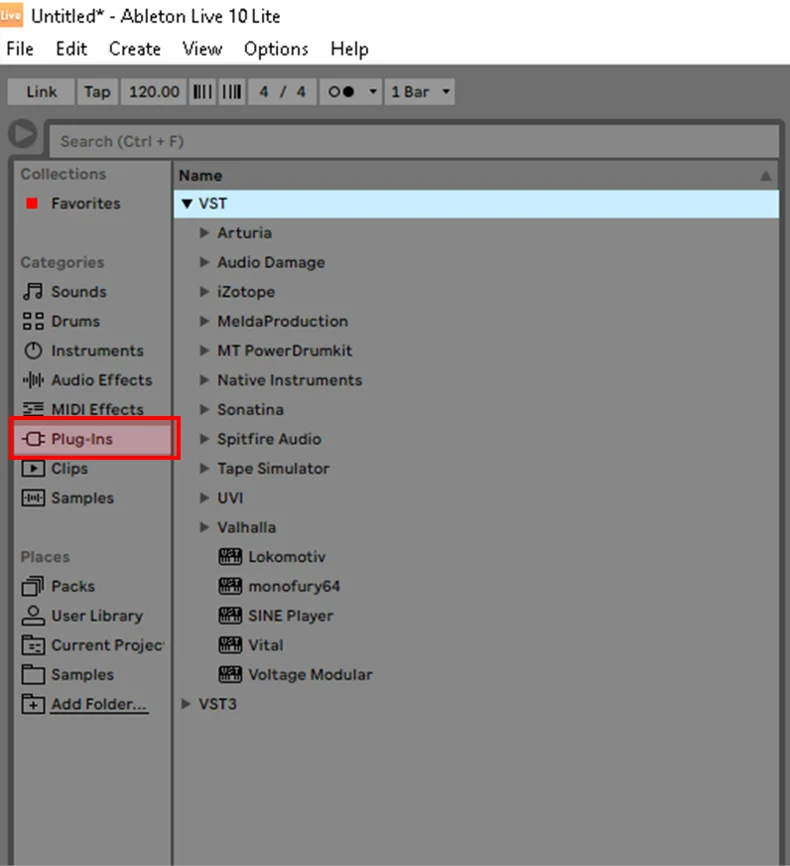
Now that the browser it open, click the “Plug-Ins” option to see a list of your plugins! I’ve highlighted this in red below!
As you can see, mine are in folders according to the plugin developer. I find this a lot easier to navigate. Checkout my tip in step 3 to see how to do this!
11. Drag the desired plugin onto your channel
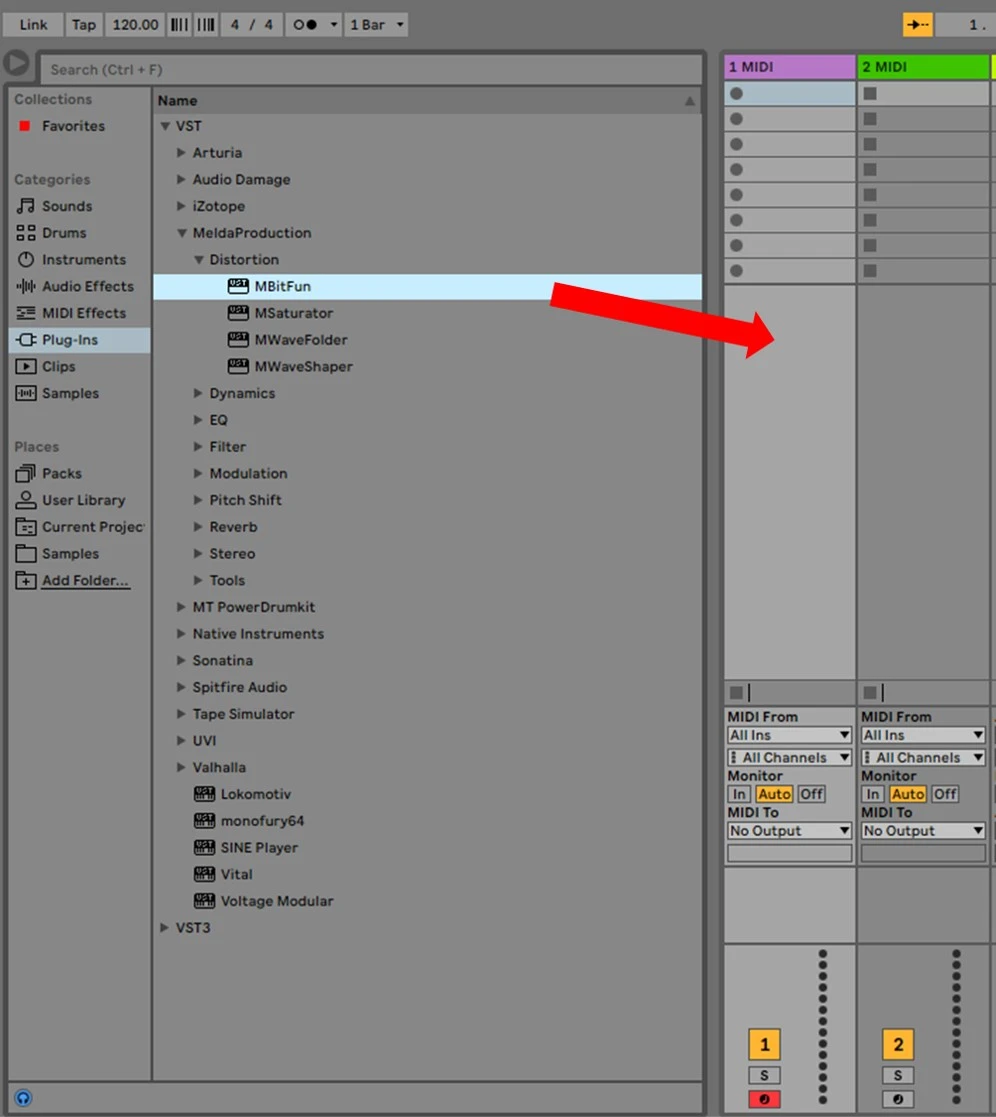
You’ve done the hard work! Now it’s just a case of dragging the VST you want and dropping it onto the channel you want. Easy!
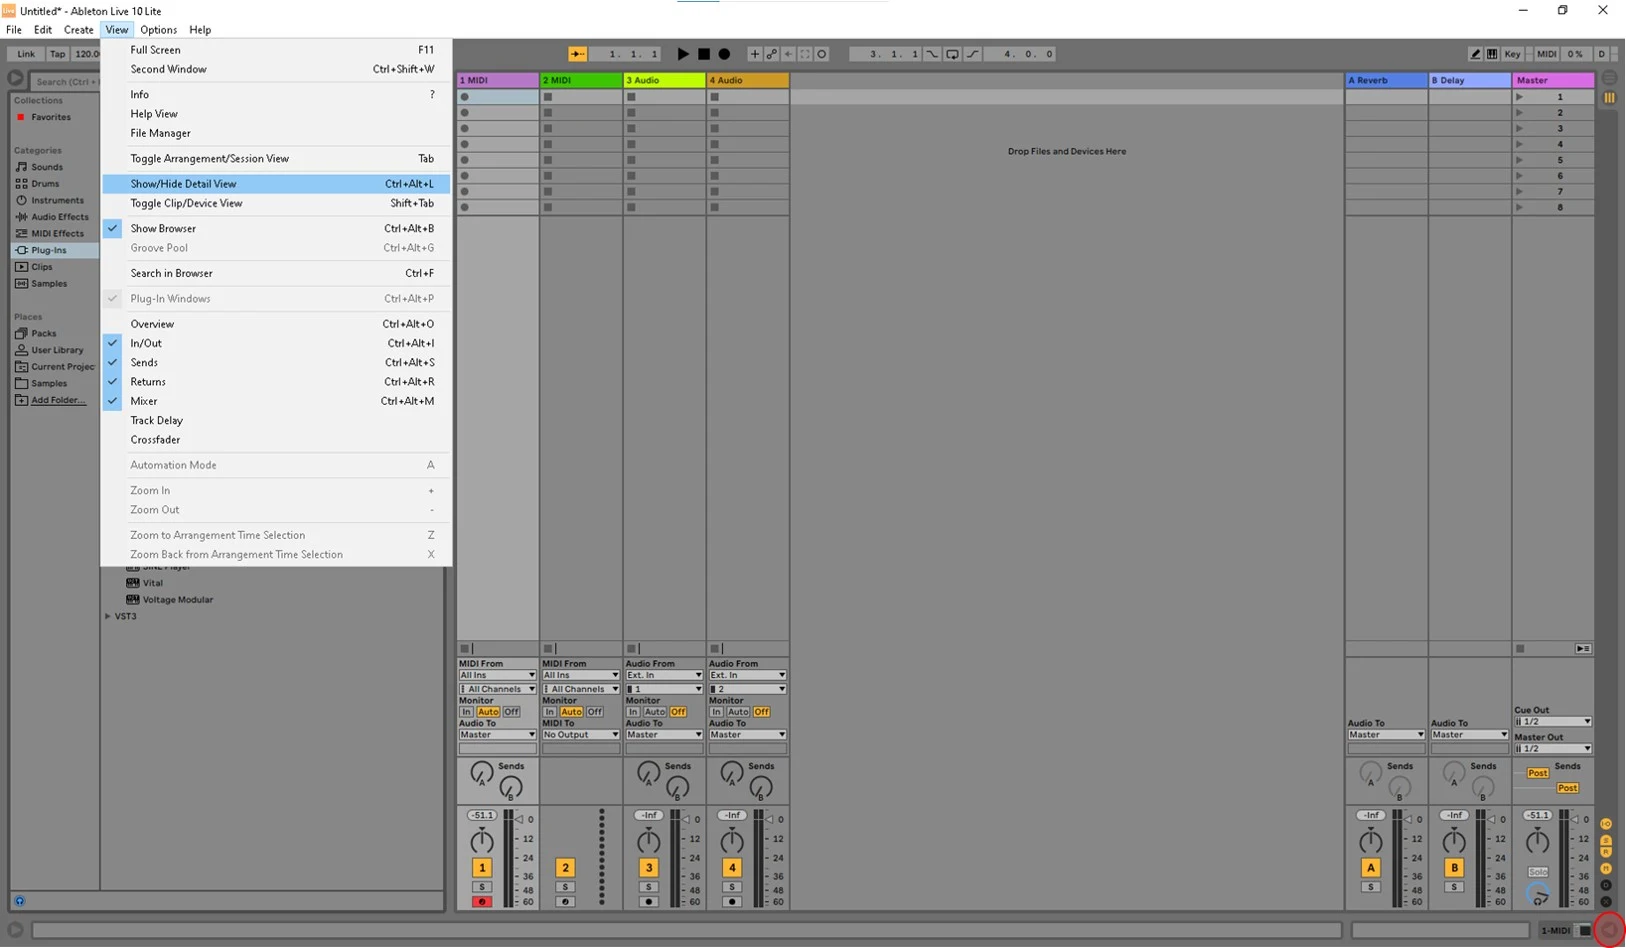
12. Select your channel and open “Detail view” (View > Show/Hide Detail View)
You’ll want to open your plugin to adjust any settings and get the sound you want.
To do this, you first need to click on your channel and show the “detail view”. You can do this by selecting “View” from the menu bar, and then “Show/Hide Detail View”. The shortcut for this is “Ctrl+Alt+L”, or clicking the arrow in the very bottom right corner, which I’ve circled in red.
13. Click the “spanner” icon on your plugin to open it
Finally, click the little spanner icon which will open your plugins interface! I’ve highlighted this in red.
You can now adjust it as needed and get the sound you want!
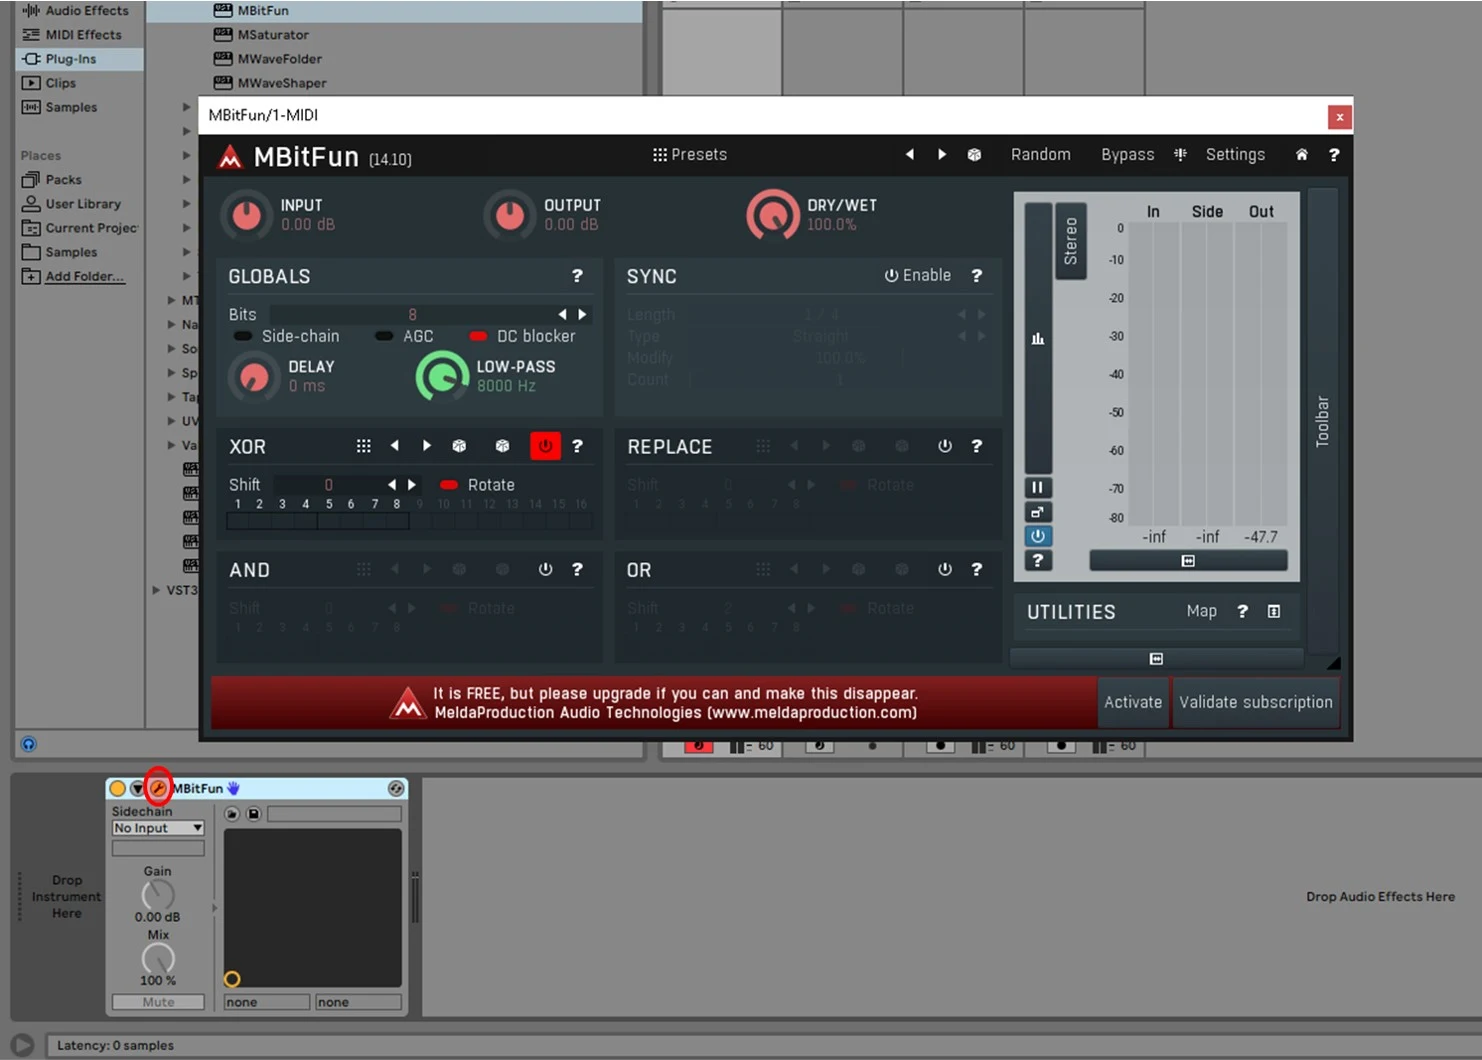
You should have now successfully installed, added, and opened a VST plugin in Ableton Live! If you’re having any issues, have a look at my troubleshooting guide below!
Troubleshooting
If you’re here, then something hasn’t quite worked for you. That’s okay! It’s probably something really simple, so let’s look at some common issues together.
If your VST isn’t showing up in Ableton Live, it’s likely to be 1 of 3 reasons.
- Your VST plugin isn’t saved in the correct folder
- Your VST plugin isn’t 64-bit
- Your plugin is an AU or AAX plugin
1. Your VST plugin isn’t saved in the correct folder
Read back through the above guide and make sure you’ve followed it step by step.
If you’ve created a custom folder to save your VST plugin into that isn’t listed as one of the recommended folders in step 3, try moving the plugin into the recommended folder for now and seeing if that works.
Make sure that it’s the .dll file that’s being saved in your VST folder and not the plugin application (i.e. the version of the plugin you can open outside your DAW)
Lastly, make sure that “Use VST2/VST3 Plug-In Custom Folder” is set to “On” and press “Rescan”.
If that’s not worked, it’s likely due to the next reasons.
2. Your VST plugin isn’t 64-bit
As I’ve said before, this is really important. If your VST plugin isn’t 64-bit, then you’re not going to be able to load it. Double check that you’ve got the right version. If you’re downloading it from a 3rd party website (i.e. not directly from the developer) then there is a chance that it may be listed incorrectly as 64-bit (this has happened to me before!).
Try searching for the plugin on the developers website and seeing whether it comes as 64-bit. If so, download a copy directly from there.
If you’re trying to bridge a 32-bit plugin using a 3rd party application like jBridge, I can’t help you here! I’d recommend not using it and finding an alternate plugin. You’ll save yourself a lot of trouble in the long-run!
3. Your plugin is an AU or AAX plugin
If you’ve downloaded an AU or AAX plugin for the Windows version of Ableton Live, it will not work! AU and AAX plugins are specifically for Mac only and will not work on a Windows machine.
Related questions
What is a VST plugin?
A Virtual Studio Technology (VST) plugin is a software application that can be added to your Digital Audio Workstation (DAW). They can be virtual instruments such as a virtual synthesiser, effects such as reverb, or processors such as compressors and equalisation.
What’s the difference between VST, VST2, and VST3?
VST and VST2 refer to the same thing. When talking about VST plugins, people are taking about VST2 plugins as this is the technology that powers MIDI VST’s (VST1.0 could not support MIDI). Ableton Live calls VST2 plugins by the correct name.
VST3 is the latest standard of VST format, which has been optimised for more contemporary uses, such as improved CPU usage, multi-MIDI inputs, and thru-routing.
Check out this article that explains the capabilities of VST3 more in-depth
Does Ableton Live support VST3?
Ableton Live fully supports VST3 plugins!
Can I run a 32-Bit plugin in Ableton Live?
You cannot run a 32-bit plugin in Ableton Live or above. 32-bit plugins are incompatible with Ableton Live as it is a 64 bit programme. You can get third party bridging software such as jBridge which will allow you to run the 32-bit plugin.
The result can be poor, however, so I recommend either finding the 64-bit version of your desired plugin or finding an alternate 64 bit plugin.
Can I use AU or AAX plugins on Windows?
AU and AAX plugins cannot be used on Windows devices as they are specifically designed for use with the Mac operating system.


Conor is a music producer, multi-instrumentalist, and all-round enthusiast from the UK with over 15 years of experience. He’s the founder and sole-content creator for the roundtable audio blog and YouTube channel.
